chapter 10: Batteries Included
지금까지 파이썬의 대부분을 알아보았다. 그것 자체만으로 막강한 힘을 가지지만 파이썬은 좀더 다룰 수 있는 툴을 제공한다. 표준 인스톨 버젼은 표준 라이브러리라고 불리는 모듈을 포함한다. 당신은 그것들을 봐왔다.(math,cmath) 이장에서는 어떻게 모듈이 동작하고 그것을 탐색하며 무엇을 제공할지 배운다. 이 장은 선택된 유용한 모듈을 중심으로 스탠다드 라이브러리에 대한 오버뷰를 제공한다.
10.1 Modules
이미 당신의 프로그램을 만드는 것을 알고 있다. import라는 외부 모듈로부터 당신 프로그램에 넣을 수 있다.
>>> import math
>>> math.sin(0)
Modules Are Programs
Listing 10-1. A Simple Module
# hello.py
print("Hello, world!")
저장하는것은 중요한 것이다.다음에서 window 또는 unix에 저장하는 것을 알아보자.
import sys
sys.path.append('D:/down3')

import hello

>>> import importlib
>>> hello = importlib.reload(hello)
Modules Are Used to Define Things
모듈은 당신의 프로그램으로 import 되어질 처음에 실행된다. 이것은 유용하다.그러나 아주 유용하지는 않다. 그것들을 의미있게 만드는것은 이후에 그 값을 유지하는 것이다. 그것은 당신이 정의한 어떤 클래스나 함수들,값을 할당하는 변수들이 모듈의 특성이 된다는 것이다. 이것은 좀 복잡할지 모르겠지만, 아주 단순하다.
Defining a Function in a Module
다음 예를 보자.
def hello():
    print("Hello, world!")

# import hello2.py
import hello2
hello2.hello()
Adding Test Code in a Module
# hello3.py
def hello():
print("Hello, world!")
# A test:
hello()
>>> import hello3
Hello, world!
>>> hello3.hello()
Hello, world!
다음 예제를 보자.
# hello4.py
def hello():
    print("Hello, world!")

def test():
    hello()

if __name__ == '__main__': test()

>>> import hello4
>>> hello4.hello()
hello4.test()
Making Your Modules Available
Putting Your Module in the Right Place
다음 예제를 보자.
>>> import sys, pprint
>>> pprint.pprint(sys.path)
위에서 알 수 있듯이 python path의 site-package 안에 다른 이름으로 넣어도 인식이 가능하다.
>>> import another_hello
>>> another_hello.hello()
Telling the Interpreter Where to Look
올바른 위치에 당신의 모듈을 넣는것은 몇가지 이유로 좋은 솔루션이 아닐 수 있다.
- 당신은 당신의 모듈을 인터프리터가 있는 디렉토리에 산만하게 있길 원하지 않는다.
- 파이썬 인터프리터 디렉토리에 저장하도록 허락하지 않을 것이다.
- 당신의 모듈을 어떤곳에 놓고 싶어할것이다.
당신의 모듈을 특정한 위치에 놓고자 하면 인터프리터에게 그 곳의 위치를 알려줘야 한다. sys.path로 직접적으로 알려주는 방법도 있지만 그렇게 하는것은 일반적이지 않다. 일반적으로 PYTHONPATH 에 모듈 디렉토리를 포함시키는 것이다. windows 와 unix계열에 각각 정의하면 된다. windows 의 경우에는 system path에 정의하면 되고 unix 계열은 .bashrc 에 export PYTHONPATH=$PYTHONPATH:~/python 이런식으로 추가하면 된다.
Packages
당신의 모듈을 구조화하기 위하여 당신은 그것들을 패키지로 묶을 수 있다. 패키지는 모듈의 다른 타입이다. 재미있는것은 다른 모듈을 포함할 수 있다는 것이다.모듈이 파일에 저장할때 패키지는 디렉토리이다. 파이썬을 패키지로 다루기 위하여 파일네임앞에 __init__.py 파일 이름을 포함하여야 한다.
예를 들자 constants/__init__.py 패키지 안에 PI=3.14 라고 정의 되어 있다면
import constants print(constants.PI)
처럼 호출할 수 있다.
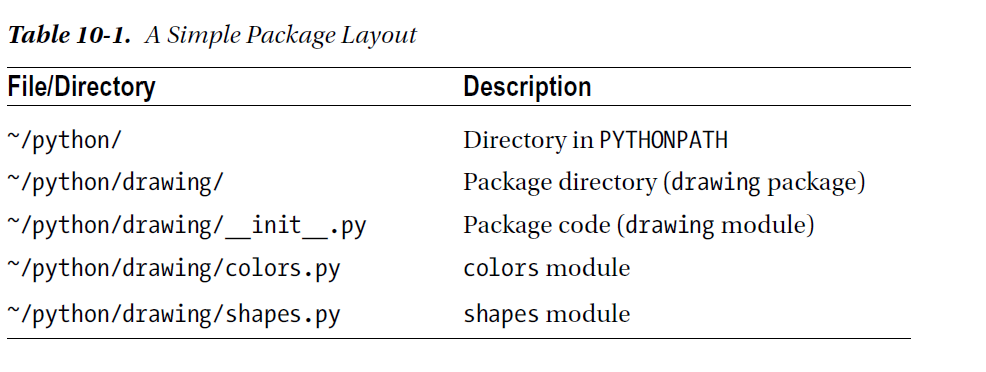
다음처럼 호출해서 쓸 수 있다.
import drawing # (1) Imports the drawing package import drawing.colors # (2) Imports the colors module from drawing import shapes # (3) Imports the shapes module
10.2 Exploring Modules
스탠다드 라이브러리를 설명하기전에 당신만의 모듈을 찾는것을 알아 보도록 하자.
What’s in a Module?
모듈을 찾는 직접적인 방법은 파이썬 인터프리터 안에서 찾는 것이다.해햐할 첫번째 것은 물론 import 하는 것이다. 표준 라이브러리에 대한 copy를 들었다고 치자. >>> import copy
exception이 발생하지 않는다.그리고 그것이 존재한다. 그러나 무엇을 할까 그것이 무엇을 포함하고 있을까?
Using dir
모듈이 포함하고 있는것을 찾기 위하여,dir 함수를 사용할 수 있다.이것은 하나의 object의 특성을 모두 가지고 있다.
import copy
>>> [n for n in dir(copy) if not n.startswith('_')]
['Error', 'PyStringMap', 'copy', 'deepcopy', 'dispatch_table', 'error', 'name', 't', 'weakref']
The __all__ Variable
다음 예제를 보자.
>>> copy.__all__
['Error', 'copy', 'deepcopy']
모든 copy 모듈의 함수를 포함하려면 다음처럼 하면 된다.
from copy import *
Getting Help with help
다음처럼 하면 해당 모듈에 대한 설명이 나온다.
>>> help(copy.copy)
Help on function copy in module copy:
copy(x)
Shallow copy operation on arbitrary Python objects.
See the module's __doc__ string for more info.

>>> print(copy.copy.__doc__)
Shallow copy operation on arbitrary Python objects.
See the module's __doc__ string for more info.
Documentation
다음처럼 하면 모듈의 문서 내용을 알 수 있다.
>>> print(range.__doc__)
range(stop) -> range object
range(start, stop[, step]) -> range object
Return an object that produces a sequence of integers from start (inclusive)
to stop (exclusive) by step. range(i, j) produces i, i+1, i+2, ..., j-1.
start defaults to 0, and stop is omitted! range(4) produces 0, 1, 2, 3.
These are exactly the valid indices for a list of 4 elements.
When step is given, it specifies the increment (or decrement).
Use the Source
문서상 이해할 수 없는 경우 소스를 분석해 보는것도 좋다. 다음 형식으로 열면 된다.
>>> print(copy.__file__)
C:\Python35\lib\copy.py
10.3 The Standard Library; A Few Favorites
sys
sys 모듈에서 사용가능한 변수들은 다음과 같다.

sys.argv 변수는 스크립트 이름을 포함하여 interpreter에게 전달되는 전달자를 포함한다. sys.exit는 현 프로그램을 종료한다.
다음 예를 보자.
# reverseargs.py
import sys
args = sys.argv[1:]
args.reverse()
print(' '.join(args))
os
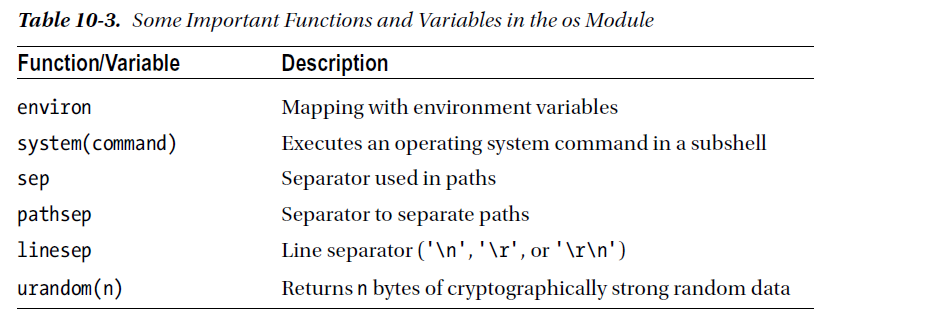
os module은 몇가지의 operation system 서비스에 대한 접근을 준다. os module은 확장적이다. 몇가지 os 모듈에서 유용한 함수와 변수를 다음에 언급했다.
에를 들면 다음처럼 실해이 가능하다.
os.system('/usr/bin/firefox')
os.system(r'C:"Program Files (x86)""Mozilla Firefox"firefox.exe')
os.startfile(r'C:Program Files (x86)Mozilla Firefoxfirefox.exe')
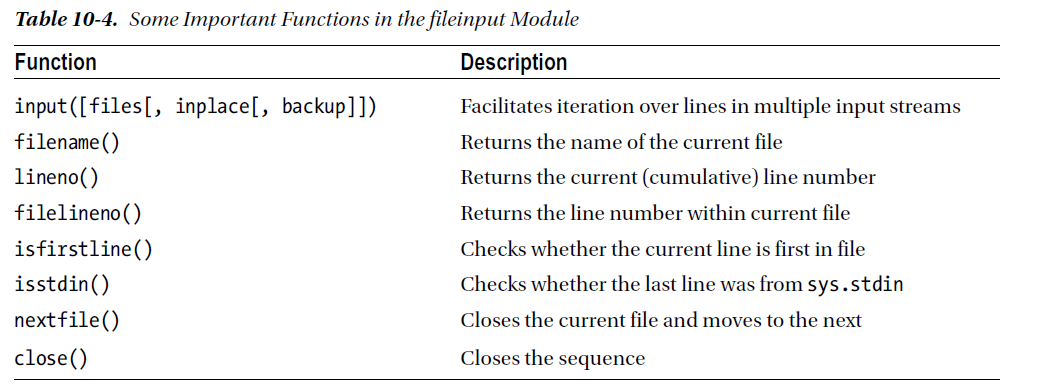
fileinput
11장에서 파일 처리하는 여러가지 법을 배울 것이다. fileinput은 라인에 있는 모든 파일을 처리할 수 있게 도와준다.
$ python some_script.py file1.txt file2.txt file3.txt
또는
$ cat file.txt | python some_script.py
fileinput에 대해서 자세히 알아보자.
# numberlines.py
import fileinput
for line in fileinput.input(inplace=True):
line = line.rstrip()
num = fileinput.lineno()
print('{:<50} # {:2d}'.format(line, num))
If you run this program on itself, like this:
$ python numberlines.py numberlines.py
Sets, Heaps, and Deques
파이썬에는 유용한 data 구조들이 많다.
sets
오래전에 sets는 sets 모듈에 Set class로 구현되어졌다. set은 build-in class로 import 할 필요가 없다.
>>> set(range(10))
{0, 1, 2, 3, 4, 5, 6, 7, 8, 9}

>>> type({})
<class 'dict'>
>>> {0, 1, 2, 3, 0, 1, 2, 3, 4, 5}
{0, 1, 2, 3, 4, 5}
전달자 없이 set을 호출할 필요가 있다.중요 사용법은 멤버쉽을 결정하는것이다. 그래서 중복은 무시된다. dictionaries와 같이 element set의 순서는 매우 임의적이다.그리고 의존적이지 말아야 한다.
>>> {'fee', 'fie', 'foe'}
{'foe', 'fee', 'fie'}
멤버쉽을 체크하는것과 더불어 union 이나 intersection 등의 다양한 표준 동작들을 할 수 있다. 다음 예를 보자.
>>> a = {1, 2, 3}
>>> b = {2, 3, 4}
>>> a.union(b)
{1, 2, 3, 4}
>>> a | b
{1, 2, 3, 4}
다음 예를 보자.
a = {1, 2, 3}
b = {2, 3, 4}
print(a.union(b))
print(a|b)

c=a&b
print(c)
print(c.issubset(a))
print(c.issuperset(a))

print(c>=a)

print(a.intersection(b))

print(a & b)

print(a.difference(b))

print(a - b)

print(a.symmetric_difference(b))

print(a ^ b)

print(a.copy())

print(a.copy() is a)
sets은 mutable이기때문에 dictionary 에서 key처럼 쓰이지 않을지도 모르겠다. 또다른 문제는 sets 자체로는 유일한 immutable 값을 가지기때문에 다른 sets 값을 포함하지 않을 지 모르겠다. sets of sets 가 종종 쓰이기때문에 이것은 문제가 된다. immutable sets를 표현하는 frozenset type도 있다. 예를 보자.
>>> a = set()
>>> b = set()
>>> a.add(b)
Traceback (most recent call last):
File "<stdin>", line 1, in ?
TypeError: set objects are unhashable
>>> a.add(frozenset(b))
Heaps
또다른 잘 알려진 data 구조는 heap이다. 큐 우선권과 같은 것이다. 우선권 queue 는 object를 임의의 순서로 추가한다.그리고 언제라도 가장 작은 element를 찾는다. 이것은 list에서 min을 사용하는 것보다 쉽다. 사실 파이썬에는 구분되는 heap type이 없다. 유일하게 heap-manuplating function만 존재한다. 이러한 모듈을 heapq 라고 불리우고 여섯개의 함수를 포함한다. 다음예를 보자.
from heapq import *
from random import shuffle
data = list(range(10))
shuffle(data)
heap = []
for n in data:
    heappush(heap, n)

print(heap)

print(heappush(heap, 0.5))
print(heap)

print(heappop(heap))

print(heappop(heap))

print(heappop(heap))

print(heap)
다음 예처럼 heappop은 가장 작은 element부터 나오게 된다.
heapify 함수는 임의의 리스트를 취하고 최소한의 suffle을 통해 legal heap로 만든다. heappush 와 heappop 사용하기 시작하기 전에 사용한다.
###heapify

heap = [5, 8, 0, 3, 6, 7, 9, 1, 4, 2]
heapify(heap)
print(heap)

heapify(heap)
print(heap)

##heapreplace
heapreplace(heap, 0.5)
print(heap)
heapreplace(heap, 10)

print(heap)
heapq 모듈의 나머지 함수는 nlargest(n,iter) , nsmallist(n,iter) n largest or smallest element들이다.
Deques (and Other Collections)
다음 예를 보자.
from collections import deque
q = deque(range(5))
q.append(5)
q.appendleft(6)
print(q)
deque([6, 0, 1, 2, 3, 4, 5])
print(q.pop())

print(q.popleft())

q.rotate(3)
print(q)

q.rotate(-1)
print(q)

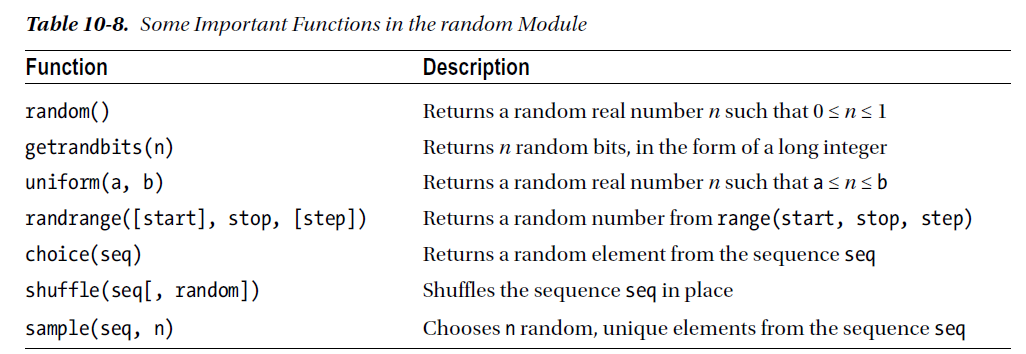
random
random 모듈은 랜덤 숫자를 리턴하는 함수들을 포함한다. 시뮬레이션이나 랜덤 아웃풋을 만드는 프로그램에 유용하다.
다음 예를 보자.
from random import *
from time import *
date1 = (2016, 1, 1, 0, 0, 0, -1, -1, -1)
time1 = mktime(date1)
date2 = (2017, 1, 1, 0, 0, 0, -1, -1, -1)
time2 = mktime(date2)

random_time = uniform(time1, time2)
print(asctime(localtime(random_time)))
주사위 던지기 메카니즘은 randrange 와 for loop로 만들어 진다.
from random import randrange
num = int(input('How many dice? '))
sides = int(input('How many sides per die? '))
sum = 0
for i in range(num): sum += randrange(sides) + 1
print('The result is', sum)
shelve and json
skip
A Potential Trap
shelve.open으로 리턴되는 object는 일상의 mapping이 아니라는 것을 아는것이 중요하다.
다음 예를 보자.
# database.py
import sys, shelve

def store_person(db):
    """
    Query user for data and store it in the shelf object
    """
    pid = input('Enter unique ID number: ')
    person = {}
    person['name'] = input('Enter name: ')
    person['age'] = input('Enter age: ')
    person['phone'] = input('Enter phone number: ')
    db[pid] = person

def lookup_person(db):
    """
    Query user for ID and desired field, and fetch the corresponding data from
    the shelf object
    """
    pid = input('Enter ID number: ')
    field = input('What would you like to know? (name, age, phone) ')
    field = field.strip().lower()

    print(field.capitalize() + ':', db[pid][field])

def print_help():
    print('The available commands are:')
    print('store  : Stores information about a person')
    print('lookup : Looks up a person from ID number')
    print('quit   : Save changes and exit')
    print('?      : Prints this message')

def enter_command():
    cmd = input('Enter command (? for help): ')
    cmd = cmd.strip().lower()
    return cmd

def main():
    database = shelve.open('C:\\database.dat') # You may want to change this name
    try:
        while True:
            cmd = enter_command()
            if  cmd == 'store':
                store_person(database)
            elif cmd == 'lookup':
                lookup_person(database)
            elif cmd == '?':
                print_help()
            elif cmd == 'quit':
                return
    finally:
        database.close()

if name == '__main__': main()
What Is a Regular Expression?
Contents of the re Module
다음을 보자.

import re

some_text1='test,beta,,,,,gama,pat,delta'

print(re.search(some_text1,'pat'))

some_text = 'alpha, beta,,,,gamma delta'
print(re.split('[, ]+', some_text))


print(re.split('[, ]+', some_text, maxsplit=2))

print(re.split('[, ]+', some_text, maxsplit=1))


pat = '[a-zA-Z]+'
text = '"Hm... Err -- are you sure?" he said, sounding insecure.'
print(re.findall(pat, text))

pat = r'[.?\-",]+'
print(re.findall(pat, text))

pat = '{name}'
text = 'Dear {name}...'
print(re.sub(pat, 'Mr. Gumby', text))
Match Objects and Groups
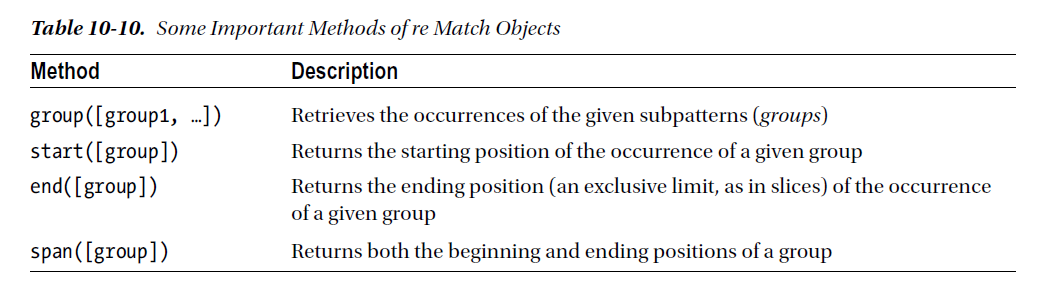
다음 예를 보자
import re

m = re.match(r'www\.(.*)\..{3}', 'www.python.org')

print(m.group(1))

print(m.start(1))

print(m.end(1))

print(m.span(1))
Group Numbers and Functions in Substitutions
skip
다음 예를 보자.
# find_sender.py
import fileinput, re
pat = re.compile('From: (.*) <.*?>$')
for line in fileinput.input():
    m = pat.match(line)
    if m: print(m.group(1))
A Sample Template System
template은 완성된 text 종류를 얻기위해 특별한 값을 넣을 수 있는 파일이다.
다음 예를 보자.
# templates.py

import fileinput, re

# Matches fields enclosed in square brackets:
field_pat = re.compile(r'\[(.+?)\]')

# We'll collect variables in this:
scope = {}

# This is used in re.sub:
def replacement(match):
    code = match.group(1)
    try:
        # If the field can be evaluated, return it:
        return str(eval(code, scope))
    except SyntaxError:
        # Otherwise, execute the assignment in the same scope ...
        #exec code in scope
        # ... and return an empty string:
        return ''

# Get all the text as a single string:

# (There are other ways of doing this; see Chapter 11)
lines = []
for line in fileinput.input():
    lines.append(line)
text = ''.join(lines)

# Substitute all the occurrences of the field pattern:
print(field_pat.sub(replacement, text))
Other Interesting Standard Modules
argparse:
cmd:
csv:
datetime:
difflib:
enum:
functools:
itertools:
logging:
statistics:
timeit, profile, and trace:
10.4 A Quick Summary
Modules:
A module is basically a subprogram whose main function is to define things, such as functions, classes, and variables. If a module contains any test code, it should be placed in an if statement that checks whether name == '__ main__'. Modules can be imported if they are in the PYTHONPATH. You import a module stored in the file foo.py with the statement import foo. Packages: ~~~~~~~~~~ A package is just a module that contains other modules. Packages are implemented as directories that contain a file named __init__.py. Exploring modules: After you have imported a module into the interactive interpreter, you can explore it in many ways. Among them are using dir, examining the __all__ variable, and using the help function. The documentation and the source code can also be excellent sources of information and insight. The standard library: ~~~~~~~~~~~~~~~~~~~~~~ Python comes with several modules included, collectively called the standard library. Some of these were reviewed in this chapter:
New Function
